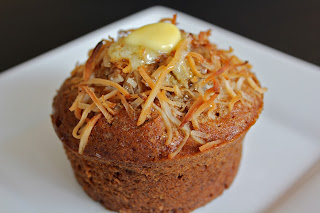
Macadamia Banana Bread


Never ever toss out a banana if it starts to get brown/black....just toss it in the freezer! They keep for a long time and are perfect for banana breads. We had 2 that had been sitting in our freezer for a few months (~5 months) and they were overripe perfection :) 

Banana bread was one of the first things my Mom taught me how to make and it's still one of my favorite comfort foods. This has been my favorite recipe for a long time, so enjoy!
Serves: 4 (4 ramekin sizes); double this recipe for (1) standard 9x5-inch pan.

Ingredients
  • 1 cup All-purpose flour  
  • 1/2 tsp Baking soda  
  • 1 dash of Salt (1/8 tsp)
  • 1/2 tsp Cinnamon
  • 1/4 cup Butter
  • 3/8 (0.375) cup Brown sugar 
  • 1 Egg, beaten
  • 2/3 (0.667) cup Bananas (overripe), mashed (1-2 bananas, preferrably 2)
  • 1/2 cup (or to your preferences) Macadamia nuts, crushed
  • Optional
    • 6oz (1/2 of 12oz bag) Milk chocolate chips
    • 1/3 cup shredded Coconut, toasted
Directions
  1. Preheat oven to 350F (175C). Lightly grease (4) ramekin dishes. 
  2. In a large bowl, combine flour, baking soda, salt, and cinnamon. In a separate bowl, cream together butter and brown sugar. Stir in eggs and mashed bananas until well blended. Stir banana mixture into flour mixture; stir just to moisten. Add the macadamia nuts (save a handful to sprinkle on top), and optional items if desirable (chocolate chips, shredded coconut). Pour batter into ramekin dishes. Sprinkle some of the crushed macadamia nuts and brown sugar on the top of each for a toasty, sweet crunch!


  3. Bake in preheated oven for 30-35 mins (60-65 mins for the 9x5 loaf), or until a toothpick inserted into center of the bread comes out clean. Let bread cool in ramekins for 10 minutes before turning out or serving.

  4. Slice some up then toast and butter (my fav). If you have ice cream, serve warm with some vanilla ice cream and enjoy! An easy trick is to scoop out some banana bread in the middle, leaving the bread in the ramekin dish, and filling with ice cream :)


How to melt some butter and toast at the same time ;)
Then it's ready for ice cream or by it's toasty self!

Filipino Chicken Adobo


This is an easy recipe that makes some juicy, flavourful chicken that falls off the bone! Filipino adobo is very different from Mexican, as it's tangy, sticky and sweet! 

Ingredients
  • 4 lbs. Chicken (skin-on, bone-in)
  • 1/2 cup Soy sauce
  • 1/2 cup Apple cider vinegar
  • 2 tbsp Vegetable oil
  • 2 tbsp Honey
  • 2 whole Bay leaves
  • 1 tbsp Garlic, minced
  • 1 tbsp Black peppercorns
  • Optional: top with fresh chopped green onion
Directions
  1. Arrange the chicken pieces in a large pot in one layer. Remove the skin if desired.
  2. Combine the rest of the ingredients (soy sauce, vinegar, honey, oil, garlic, bay leaves, peppercorns) in a bowl and whisk until the honey is dissolved. Partially crush the peppercorns if desired. Pour the marinade over the chicken. Cover and refrigerate for a few hours or over night.  
  3. When you're ready to make the chicken, add just enough water so that the liquid comes just up to the top of the chicken (about 1/2 cup). Cover the pot with a lid, place the pot over a high flame, and bring it up to a rolling boil. When it reaches a boil, reduce the heat to medium/low and let simmer for 30 minutes.
  4. Preheat your broiler on high. Remove the chicken from the pot and place it on a broiler pan (or a sheet pan with wire cooling racks placed on top). Place the chicken under the broiler until it is brown and crispy on top (5-10 minutes), depending on your broiler). 
  5. While the chicken is broiling, turn pot with the soy/vinegar liquid up to high and bring up to a rapid boil. Allow the liquid to boil heavily until it is reduced in volume by approximately one half. You may need to boil it for 5-10 minutes longer than the chicken is in the oven to get it to this point.
  6. Use a soft brush to baste a few layers of the reduced soy/vinegar liquid onto the browned chicken. Serve over rice or noodles and spoon more of the reduced liquid over top.
 BudgetBytes finished version looks a little better than mine, ha ha.

Hkatenkwan (Ghanaian Groundnut Stew)


I stumbled across this on tastespotting and was curious about this African "peanut butter" stew. I love the individual ingredients...peanut butter, sweet potato, chickpeas, chili flakes...but all together in a peppery, tomato-based stew? I've never had anything like this, so I figured I'd either love or hate this. Challenge: accepted. 

I found a few recommended and traditional recipes, keeping the traditional and most common ingredients. I added a little fennel and Thai fish sauce to add some flavour twists and swapped out the cayenne pepper for chili flakes for a nice heat (we like it spicy)! Well, an hour of simmering chili flakes made for a lingering burn, so I blended up a fruit lassi to take away the sting and it was perfect.

The final result: a spicy, peanut buttery heaven that is going in my all-time favorite recipes.


Groundnut is the common African word for peanut. This chicken groundnut stew is the Western African (Ghanaian) version of the groundnut/tomato stew eaten all over sub-Saharan Africa. The Western African style is usually more elaborate, with more ingredients and garnishes, which is noted in the optional ingredients. Suggested serving sides include ginger beer or green tea w/ mint with or after the meal to drink, followed with a fruit salad. 

Prep time: 15 minutes
Cook time: 1 hour, 45 minutes 
Yield: Serves 6-8 

Ingredients
  • 2-3 pounds Chicken legs, thighs and/or wings
  • 2 tbsp Vegetable oil
  • 1 tbsp Peanut oil
  • 1 large Onion (yellow), sliced
  • 3-inch piece of Ginger, peeled and minced
  • 6-8 garlic cloves, chopped roughly
  • 2-3 pounds sweet potatoes, peeled and cut into chunks
  • 1 15-oz can of crushed Tomatoes 
  • 1 quart Chicken stock 
  • 1 cup Peanut butter 
  • 1 cup roasted Peanuts
  • 1 can Chickpeas 
  • 1 tbsp ground Coriander 
  • 1 (heaping) tbsp Fennel, to taste 
  • ~1.5 tbsp Thai Fish Sauce 
  • 1 tsp dried Chili flakes
  • Salt and black pepper, to taste (skip the salt if using salted peanuts; lots of cracked black pepper) 
  • 1/4 to 1/2 cup of chopped cilantro (didn't have) 
  • Optional additions: green chile peppers/habanero, bell pepper, pumpkin, squash, carrot, okra, eggplant, boiled egg.
  • Optional sides: steamed rice and (it's not African, but serve with) a fruit lassi to cool the heat ;)

Directions
  1. Heat the vegetable and peanut oil in a large soup pot set over medium-high heat. Salt the chicken pieces well, pat them dry and brown them in the oil. Don't crowd the pot, so do this in batches. Set the chicken pieces aside as they brown. 
  2. Sauté the onions in the oil for 3-4 minutes, stirring often and scraping any browned bits off the bottom of the pot. Add the ginger and garlic and sauté another 1-2 minutes, then add the sweet potatoes and stir well to combine. 
  3. Add the chicken, chicken broth, crushed tomatoes, peanut butter, peanuts, chickpeas, coriander, fennel, fish sauce, and chili flakes and stir well to combine. Bring to a simmer and taste for salt, adding if needed (depends if you use salted peanuts and salted peanut butter - you may not need to add any salt). Cover the pot and simmer gently for 90 minutes (check after an hour), or until the chicken meat easily falls off the bone and the sweet potatoes are tender. 
  4. Remove the chicken pieces and set them in a bowl to cool, until cool enough to touch. Remove and discard the skin if you want, or chop it and put it back into the pot. Shred the meat off the bones and put the meat back in the pot. 
  5. Adjust the seasonings if needed, then add as much black pepper as you think you can stand—the stew should be peppery. Stir in the cilantro and serve with a cool drink (ginger beer, green tea w/ mint, or my fav for spicy foods: fruit lassi)!


References:

Mexican Posole (Shredded Pork & Hominy Soup)


The one bummer to North Australia: Mexican food. However, that gives us a huge plus: we can cook proper Mexican now! Finding the ingredients aren't too hard, if you know where to go (Pennisi)...and the rest is easy and damn worth it! :)

Serves 6-8.

Ingredients
  • 750 grams pork shoulder, cubed
  • Canola oil
  • 1 large onion, diced
  • 3-4 cloves garlic, diced
  • 1-2 whole chiles, roasted (Jalapeno is great, so is Ancho or Anaheim - whatever you have handy)
  • 2 cans (500g) hominy, drained
  • 1 dried guajillo chile (if you can find it)
  • 2-3 tsp smoked paprika
  • 2 tsp Mexican oregano (Italian will do if you can't find it)
  • 1 tsp fresh ground cloves
  • 1-2 tsp ground cumin
  • 1 (large) bunch of cilantro, stemmed and chopped
  • Salt
  • Pepper
  • Radishes, thinly sliced
  • Red cabbage, thinly sliced
  • Carrot, shaved
  • Avocado, sliced
  • Tortilla strips
  • Hot sauces
  • 2 scallions, finely sliced
  • 4 tomatoes, diced
  • 1 large onion, diced
  • Fresh limes
Directions
  1. Begin by browning the cubed pork shoulder over high heat with the canola oil in a large soup pot.
  2. Towards the end of the browning, toss in 1 of the diced onions and let them brown just a bit.
  3. Once the onions are nearly done, add in the garlic.
  4. After 60 seconds add enough water to just cover everything, bring to a boil, and then let it simmer for about 60-90 minutes.
  5. While this is simmering, begin the rest of the prep.
  6. All ingredients after the pepper are garnishes, and should be prepared now and set aside.
  7. Combine half of the tomato with half the onion. Add salt, pepper, some diced chili, lime juice, and 1/3 of the cilantro to finish up the pico de gallo.
  8. In another bowl add some avocado, the remaining tomato, most of the remaining onion, another 1/3 of the cilantro, lime juice, salt, pepper, cayenne, and mix to make guacamole.
  9. The remainder of the garnishes should be set aside.
  10. Once the pork shoulder has cooked well, remove the meat and shred it. Then add it back into the soup.
  11. Add in all the remaining ingredients and let it simmer for another hour at least.
  12. Serve in a bowl and garnish with everything you have at hand including plenty of your favorite hot sauce.
  13. Bon ap!
All the goodies: guacamole, pico de gallo, and posole garnishes!

Shredding the pork.

Simmering posole.

Guacamole.

Hot sauces: check.

Adding the garnishes...

Adding more garnishes...

Topping up with some fresh avo!

The BF, making things look good ;)

Crepe-Crust Quiche


Simple, fun to eat, and amazing recipe (thank you, bf)! They could be great appetizers too ;)

Ingredients
  • Crepe
    • One of the few recipes I do not modify in any way. I use Alton Brown's recipe and follow the instructions to a "T". It always comes out perfect. Make sure and go with the savory style and toss in some fresh chives for this particular application.
  • Quiche
    • 1 medium onion, diced
    • 3-4 strips of bacon, diced
    • 1/2 cup diced mushrooms
    • 4 whole eggs, beaten
    • 1.25 cups soy cream + 1/2 stick melted butter (substituted for heavy cream + milk in the traditional recipe)
    • 1/2 cup finely grated parmesan
    • Salt, to taste
    • Pepper, to taste
Directions
  1. After following the directions to prepare the crepe batter, let that sit in the fridge whilst preparing the filling.
  2. Sautee the bacon, onion, and mushrooms over medium heat until the fat is well rendered out and the onions are moderately caramelized.*
  3. While the sauté is going, beat the eggs, cream, salt, pepper, and melted butter until thoroughly mixed in a bowl. Make sure and save the butter till the end and add it slowly so it emulsifies well.
  4. Remove the sauté contents, turn up the heat to high, and in the same pan pour in just enough of the crepe batter to cover the pan. Once the top of the crepe has set up, flip the crepe and let it brown just a little. Set aside and cover with foil to stay warm. Make sure and add just a little butter to the pan between crepes.
  5. Once you have finished with the crepes, use them to line a ramekin. Fill approximately 2/3 full of the sauté mix, then pour the egg/soy/butter mixture over the top until about 90% full. Cover with the cheese and sprinkle on some more fresh cracked black pepper.
  6. Place ramekins in a pre-heated 375 degree F oven and bake for 15 minutes or until crust is golden brown and the contents are somewhat set.
  7. Let them cool for 10-15 minutes to fully set and not melt your tongue.
  8. Bon ap!
*The beauty of a quiche is that you can substitute whatever fillers you want, so be creative and use it as an excuse to use up your leftovers, frozen veg, and pantry!

Artichoke Chicken & Warm Zucchini Chickpea Salad


Well this was a pleasant surprise! I was looking for ways to cook a chicken breast and cruised through some of the top chicken recipes on allrecipes.com. Not noticing my internet had automatically re-routed me to the Australian version, I was curious about this 5-ingredient, top-scoring recipe and happened to feel a little adventurous. It did not disappoint and all the praise about this being the "most flavourful" and juicy chicken recipe were spot on! This is a keeper for some good home cookin :)


Oh yea, and I made a ribboned zucchini salad for the first time! 

Serves: 4  

Ingredients
  • Artichoke Chicken
    • 1 (15 ounce) can artichoke hearts, drained and chopped 
    • 3/4 cup grated Parmesan cheese 
    • 3/4 cup mayonnaise 
    • 1 pinch garlic pepper 
    • 4 skinless, boneless chicken breast halves
  • Zucchini Chickpea Salad
    • 3-4 Zucchini
    • 1 can Chickpeas, rinsed and drained
    • 2 garlic cloves
    • 2 anchovy fillets, minced (about 1 tablespoon)
    • 1 tsp tahini 
    • 1 lemon, zested and juiced
    • 1 tablespoon olive oil 
    • Sea salt/Cracked black pepper (to taste)
    • 1-2 tsp water
    • Walnuts, coarsely chopped (to taste)
    • Grated Parmesan cheese (to taste)
    • 2-3 Basil leaves (fresh), julienned
Directions
  1. Preheat oven to 375 degrees F (190 degrees C). 
  2. In a medium bowl, mix together the artichoke hearts, Parmesan cheese, mayonnaise, and garlic pepper. Place chicken in a greased baking dish, and cover evenly with artichoke mixture. 
  3. Bake, uncovered, for 30 minutes in the preheated oven, or until chicken is no longer pink in the center and juices run clear. While the chicken is baking, start prepping the zucchini salad, below.
  4. Using vegetable peeler and firmly holding zucchini by stem end, shave zucchini lengthwise into long ribbons. Lay across on an oven grate and place in oven with the chicken (or even put the grate on top of the chicken baking dish). Leave for ~15 minutes, or until zucchini is soft or beginning to caramelize.
  5. In a small frying pan over medium heat, saute chickpeas and whole garlic cloves in 1 tablespoon of olive oil (just enough to moisten) for about 3 minutes, until the chickpeas dry out a bit and are warmed through. Remove garlic cloves, chop finely, and place in a small bowl. In the small bowl, combine minced anchovy, tahini, lemon juice and zest, olive oil, and salt/pepper (to taste). Add water by the teaspoon until the dressing is smooth and runny. 
  6. When the zucchini is ready, add the warmed chickpeas and toss with walnuts and dressing until everything is coated. Grate fresh parmesan on top and add julienned basil. Serve warm or room temperature. 

Roasted Chicken and Sour Cabbage w/ Tomato Salad


Aka, "Chicken Pavlova," aka, my favorite Bulgarian's family dinner. Pretty much, this is the bf's family recipe that could cure anything. A rotisserie-style chicken with a tangy cabbage side that is cooked underneath the chicken, catching all the flavor! Add the bf's fav salad and we've got some home cookin' from the casa de Pavlov.


BF's note - it is also super easy to make

Serves 4.

Ingredients
  • 1 whole chicken
  • 1 large can/jar of saurkraut
  • 1/2 head of cabbage, shredded like for slaw (or a whole one if it is not a huge cabbage)
  • 1 onion, cut in half
  • 1 stalk of celery, chopped into thirds, with the leaves
  • 1 lemon, cut in half
  • 1/2 stick of butter
  • Smoked paprika
  • Black pepper
  • Cayenne pepper
  • Lemon pepper
For the salad:
  • Tomatoes, sliced
  • Onions, sliced
  • Feta cheese, crumbled
  • Olive oil
  • Cracked black pepper
Simply combine all the ingredients in a bowl and let it marinade for a few minutes

Directions
  1. Get the butter and mix in the spices (you can add some more if you want to perk it up even more)
  2. Open up the chicken and carefully lift the skin from the flesh.
  3. Rub the butter in between the skin and flesh
  4. Stuff the chicken with the celery, onion, and lemon and tie the legs together
  5. In a large braising pan, add the saurkraut and cabbage, mixing it together and distributing evenly across the whole bottom of the pan
  6. Put a rack across the top of the pan and place the chicken, breast side up, on top
  7. Place in a pre-heated (350 degree F) oven for 1h15m
  8. After 1h15m, turn the heat up to 450-500 degrees for 10-12 minutes
  9. Turn off the oven, flip the bird upside down, and let it coast to a finish for about 10 minutes.
  10. Remove from the oven, cover with aluminum foil, and let the bird rest for another 10 minutes
  11. Slice, plate, and serve!
  12. Bon ap!

Sub note: I shared this recipe with my family (on Thanksgiving nonetheless) and it's been added to my family's favs and annual Thanksgiving menu. It's a winner...so thank the bf's family for this!

Roasted Pumpkin w/ Walnut & Shredded Chocolate


Ok, and a scoop of ice cream! This may not be the healthiest of things, but it's a dessert on a mission! To make me happy :)

Ingredients
  • 1/4 Kent pumpkin, sliced in half
  • 1-2 tbsp Vegetable oil
  • 1-2 tbsp Butter
  • 2-3 tbsp Brown sugar
  • Walnuts, crumbled
  • Shredded chocolate (to taste)
  • 1 scoop, Vanilla ice cream
Directions
  1. Preheat oven to 400F (200C). 
  2. On a cookie sheet, lay aluminum foil down (easier to clean). Score the (2) 1/8 slices of pumpkin to allow even cooking and then rub with vegetable oil until coated. Bake at 400F for 30-60 mins, or until a fork pierces through the pumpkin easily. 
  3. When done, turn the oven off, pull the cookie sheet out and rub the butter over the pumpkin with a spoon or fork (it will be hot). Sprinkle the brown sugar, walnuts, and shredded chocolate on top and put it back in the (off) oven for 5-10 mins. 
  4. Pull it out and top with a scoop of ice cream! 
You now have one amazingly delicious and easy dessert to enjoy! It's one of my favs ;)
Cheers!

World's Best Fish Tacos

Mahi Tacos @ OB's South Beach Bar & Grille (photo courtesy of yelp.com)
I attempted to re-create the best fish taco’s known to mankind, which can be found in Ocean Beach, San Diego at a local fav, South Beach Bar & Grille. I've had fish tacos across the US, Mexico, and Australia...and to this day, nothing compares to the world famous fish tacos in OB. I’ve done my research and this is almost as good! It's one of my all-time fav recipes, so enjoy :) 


I<3 
OB

Pre note: It's best to prepare and marinate some of the items in advance, so whipping up the salsa and cilantro sauce ahead of time is helpful! Also, marinate the fish for at least 1 hour...but overnight marinating would overpower the delicate white fish, so I'd recommend 1-2 hours ;)

Yields: varies

Ingredients
  • Mahi 
  • Cheddar cheese 
  • Purple cabbage 
  • Few Limes 
  • Flour tortillas 
  • Pineapple-Teriyaki Marinade
    • 1/2 cup Brown sugar
    • 5 oz Soy sauce (~0.63 cups)  
    • 1 cup Crushed Pineapple
  • Salsa Fresca
    • Onion, diced 
    • Tomato, diced
    • Garlic cloves, minced
    • Cilantro, chopped
  • Cilantro Sauce
    • 1 tbsp. Cilantro leaves, chopped (fresh)
    • 1 tbsp. Jalapeno pepper, chopped
    • 1 Garlic clove
    • 1/2 Lime, juice and zest
    • 2 tbsp. Plain yogurt
    • 1 tbsp. Mayonnaise
    • 1 tbsp. Sour cream
Directions
  1. Prepare
    1. Marinate: Mix the brown sugar and soy sauce together and stir until sugar is dissolved. Add crushed pineapple. Marinate the mahi in the Pineapple-Teriyaki Marinade for 1-2 hours.
    2. Yogurt sauce: puree the cilantro, jalapeno, garlic, and lime juice with zest. In a separate bowl, add the yogurt, mayonnaise and sour cream, and then fold the puree in. Cover and refrigerate. 
    3. Salsa fresca: quantities to your satisfaction. 
  2. Grill
    1. Fire up the bbq! Grill the mahi to your satisfaction. Note: mahi cooks through quickly, so keep an eye on it...but a little charring on the edges is a flavorful plus! 
    2. Warm the tortillis on the grill and melt some cheese on one side of the tortilla. 
    3. Assemble the goods, top with the cilantro sauce and serve with some sliced limes (to squeeze the juice over the tacos)! 
    4. ¡Buen provecho! (Enjoy your meal!)
Mahi Tacos @ OB's South Beach Bar (photo courtesy of yelp.com)

Mahi Tacos @ OB's South Beach Bar (photo courtesy of yelp.com)
I guess I'll have to make these so I can get my own photos...someone get hungry!
^As a follow up....here's round one:


Keywords: fish, tacos, mexican, grilled, bbq, mahi, ob, ocean beach, south beach, grill, california, ca.

Sushi Platter


Sushi is easy and fun! It's super cheap to make it at home and even better for large groups (i.e., dinner parties)! The trick is to 1) have fresh fish, and 2) make "sushi rice," or "shari." Other than that, it's just a quick stop in the Asian aisle or Chinatown market! The beauty with sushi is that it's just like making a sandwich - you can put in whatever you like :)

The sushi essentials:
1) fresh fish
2) filling/topper ingredients
3) sushi rice
4) nori sheets
5) bamboo mat
6) condiments (wasabi, pickled ginger, soy sauce)

And if you're doing a dinner party, it's great to serve with 7) sides. Appetizer sides are generally miso soup, cucumber salad, or seaweed (wakame) salad. Other items include sake or Sapporo (or both for a sake bomb), and quail egg shooters in the drink categories....or the best desserts: mochi ice cream or frooshi (fruit sushi). Most of these things can be easily found in the international aisle in a grocery store, but we suggest stopping by a local Chinatown market (better prices and more variety). Here's what we usually go for....

Serves: however many rolls you make!

Ingredients
  • 1) Fresh Fish
    • Salmon, sliced (sushi/ahi-grade or very, very fresh)
    • Poke
      • Chopped up fresh tuna
      • Sesame oil
      • Soy sauce
      • Nước mắm
      • Dried shrimp
      • Hot chili oil (I get the stuff with black beans in it)
      • Freshly toasted black and white sesame seeds
      • Finely chopped scallions
      • Ginger powder
      • Wasabi powder
  • 2) Fillings/Toppers
    • Teriyaki sauce (fav recipe)
    • Dynamite sauce
      • 1/4 cup mayonnaise (low or fat-free ok) 
      • 1 tablespoon Sri Racha hot sauce
      • 1/2 teaspoon tobiko
    • Spicy Krab
      • 4-6 sticks Imitation Crab, chopped (to taste)
      • 1-2 tbsp Mayonnaise (to taste)
      • Sri Racha (to taste)
      • Optional: 1 tsp Fish Sauce (to taste)
    • Carrot, shredded or thinly sliced (thin carrot "sticks")
    • Cucumber, thinly sliced
    • Avocado, thinly sliced
    • Green onion, sliced
    • Sesame seeds, toasted
    • Tobiko (tiny, orange fish roe)
    • Cream cheese
  • 3) Sushi Rice (aka, "shari")
    • 2 cups Medium-Grain Rice
    • 1.5-2 cups water
    • 2 tbsp Salt
    • 4 tbsp Sugar (white)
    • 4 tbsp Rice wine vinegar
  • 4) Nori Sheets
    • 1-2 Packages Nori (grab the toasted kind, if available - more flavor)
  • 5) Bamboo Mat
  • 6) Condiments
    • Soy Sauce (to serve)
    • Wasabi (to serve)
    • Pickled ginger (to serve)
  • Optional: miso soup, cucumber salad, wakame salad, sake and Sapporo, quail egg shooters, mochi ice cream.
Directions
  1. Soak the rice in cold water for at least 30-60 mins prior to cooking (if you can). Rinse the rice, washing away the powder rice starches until the cloudy water is clear (note: soaking and rinsing is important in obtaining the right "sticky rice" texture). Add the soaked and rinsed rice to a pot and fill with 1.5-2 cups of water (note: the best trick to getting the right amount of water is placing your index finger on top of the evened out rice and filling with water until it reaches your first knuckle). Bring to a boil, top with a lid, then reduce the temperature to medium-low and allow to simmer until all the water is cooked off (10-15 mins). The best way to test is the taste test! Take a bite of the rice (it'll be hot, so be careful) and if the center of the grains are still a little hard, cook a little longer (and add water if the bottom of the pot is dry). When the grains are cooked through, take the pot off the heat and using a spatula, "cut" through the rice (do not stir) to "fluff" it up. Put the lid back on and allow to sit for 5 mins.
  2. In the mean time, put the salt, sugar, and rice wine in a microwave-safe bowl and microwave for 1 minute. Take it out, stir for a minute or two, and microwave again for 30 seconds and stir some more. It takes some time for the salt and sugar to dissolve, so stir when you can. When it's dissolved (~5 mins), lightly pour over the fluffed rice, "cutting" through the rice to best mix the rice...without stirring! Stirring with a spoon (for example) will smoosh the grains and you'll get a mushy, sticky mess. Now that you have a beautiful sticky rice prepared, time to prep the sushi fillings!
  3. Prepare the teriyaki sauce, dynamite sauce, and spicy krab topping. Set aside. Slice the carrot, cucumber, avocado, and green onion. Toast the sesame seeds (toasting brings out the flavor tenfold). Place your filling/topper ingredients in an assembly-line on the kitchen counter and you are ready to roll!
  4. Fill a small bowl of warm water and set next to your bamboo rolling mat. Place the nori smooth-side down (rough-side facing up) on the bamboo rolling mat. Wet your fingers and grab a handful of sushi rice and spread around to cover 3/4's of the sheet, leaving the bare nori side farthest from you, like this:
  5. Like in the above photo, lay your "filling" ingredients across the rice. You'll want to lay them down closer to you, rather than farther down the rice, as it'll be easier to roll. Now flip over the edge closest to you and begin rolling, tightening the roll by squeezing back on the bamboo mat. The technique is quite simple, as seen below:
  6. (jump to 55 seconds)
  7. With a very sharp knife, slice the rolls and lay on a serving platter. Top with preferred topping ingredients (toasted sesame seeds, tobiko, spicy krab, dynamite sauce, teriyaki sauce, etc.) and serve with the condiments ready! Some basic sushi rolls are outlined at the bottom of this blog, so those are good places to start. But it's fun to get creative, so make every roll different! The varieties are endless :)
  8. Sake bomb, sake bomb, SA-KE BOMB! Kanpai =^.^=
Teriyaki rolls.

The full platter: maki rolls, temaki (hand) rolls, nigiri and sashimi!
If you're wondering:

  • Maki rolls are the popular round sliced rolls filled with rice and fish
  • Temaki rolls are the hand rolls which have generous portions of the filling rolled up like an ice cream cone in the nori.
  • Nigiri is a thick slice of fish formed on top of a ball of sushi rice, generally with a "dot" of wasabi and sometimes held together with a small strip of nori.
  • Sashimi is a thick slice of raw fish and nothing else. The mother of sushi-lovers.


First attempt at nigiri (note: that's what sushi looks like
with long-grain rice versus short-grain....not so good, lol).
Spicy krab topped sushi.
Sashimi slices...my fav!
Spicy krab, teriyaki, and tobiko topped makisushi.
Sushi Rolls:

  • California Roll: avocado, imitation crab stick, cucumber, and tobiko. Roll with sesame and rice on the outside, nori and fillings on the inside.
  • Caterpillar Roll: unagi (eel), avocado, and cucumber. Roll with avocado slices and rice on the outside, nori and 3 fillings on inside (it usually looks like a caterpillar).
  • Crunchy Roll: tempura shrimp (fried), avocado, and green onion.
  • Dynamite Roll: yellowtail (hamachi) and/or prawn tempura, bean sprouts, carrots, avocado, cucumber, chili and spicy mayonnaise.
  • Fuji Mountain Roll: tempura shrimp (fried) and avocado on the inside; tuna, salmon, yellowtail, spicy krab, teriyaki sauce, sri racha, scallion and sesame seeds on the top (it's a mountain roll after all)!
  • Godzilla Roll: tempura shrimp (fried), teriyaki sauce and sri racha sauce.
  • Philly Roll: salmon (raw or smoked), cream cheese, and avocado.
  • Rainbow Roll: avocado, imitation crab stick and cucumber topped with tuna, salmon, yellowtail, and avocado...to look like a rainbow.
  • Spicy Tuna: tuna (raw), spicy sesame oil, sri racha sauce, and spicy mayonnaise.
  • Spider Roll: tempura soft shell crab (fried), cucumber, avocado, sprouts, tobiko, and spicy mayonnaise.

Salmon Blini w/ Chives, Pico de Gallo, and Yogurt


The salmon burgers we made the previous night yielded some left overs... so, I had to do something with it. The gf was dubious. I was confident. Chive infused salmon stuffed blini resulted.

Serves 2+ (depending on your left overs)

Ingredients:
  • Salmon mix (make the night before)
  • Grated parmesan
  • Crêpes
    • 1 large egg
    • 85g milk (3 fluid oz)
    • 56g water (1/4 cup)
    • 1/2 cup water
    • 2 tbsp melted butter
    • 1 tsp salt
    • 1 tbsp cracked black pepper
    • 3-4 tbsp chopped chives
  • Pico de Gallo
    • 1 small tomato, diced
    • 1/2 small onion, diced
    • 1/2 jalapeno pepper, diced
    • 3-4 tbsp fresh lime juice
    • 3-4 tbsp chopped cilantro
    • salt
    • pepper
  • Yogurt (or sour cream)
  • Extra chives for garnish
  • Extra butter for the pan
Directions:
  1. Take all the ingredients for the crêpes and put them in a food processor (or blender if you don't have one) and pulse till nice and smooth. Place in the refrigerator for preferably at least 1 hour, but at least 20-30 minutes. This will let the bubbles settle out and the gluten come together.
  2. During this time, prepare your pico de gallo (i.e. chopping up the ingredientes and mixing them into a bowl). Place in the fridge and kick back with your coffee and morning blog of choice.
  3. Once the fixins have sat for a sufficient time, get a pan nice and hot (very hot) and put a small pat of butter on it, distributing it evenly. Ladle on just enough of the crêpe mix to barely cover the pan and then let it sit for about 15-20 seconds longer than it takes for the top to set firmly. Flip and let the other side brown for about 30-45 seconds. Remove from the pan, cover with some aluminum foil, and make the rest.
  4. Spoon some of the salmon mix (from last night) onto the center of the crêpes. Put a generous helping of the parmesan cheese on top of the mix, then fold like a burrito.
  5. Using the same pan, but this time on slightly more than medium heat, add a little butter and then place the blini with the free edge down and cover with a lid. Depending on the size of them they will take anywhere from 5-8 minutes to be fully cooked.
  6. The bottoms should be nice and crispy and sealed up with gooey cheese, so place one face up and the other face down to make them look pretty, garnish with the pico de gallo, a bit of chive, and some yogurt (or sour cream).
  7. Bon ap!

Black Sapote (Chocolate Pudding Fruit)


This is a black sapote. It doesn't look that special, but what's inside is worth gold.
Why? It tastes like chocolate pudding.


On a spur-of-the-moment trip to Byron Bay (NSW, Australia), we spotted a random "theme park" tucked away in the water-slide and roller coaster parks scattered around the Gold Coast. A giant sign on the side of the freeway read "TROPICAL FRUIT WORLD".....tropical fruit world? WTF? If this is Australia's equivalent of the USA's giant ball of twine? If so, I'm in! We ventured our way to this mysterious destination to learn it has the world's largest variety of tropical fruit (insert: hell yes), complete with tastings of the unique fruits, orchard tours, and even kangaroos and koalas. We left with a few interesting fruits such as the abiu (tastes like vanilla custard) and rollinia (tastes like lemon merengue pie)...but the black sapote was probably my favorite!

A black sapote is a type of persimmon native to Mexico and Central America. It is more commonly known as the "chocolate pudding fruit," due to the flavor, consistency, and color of the inside. The fruit is about 2-4 inches in diameter and soft when ripe. The info provided at Tropical Fruit World stated it was best eaten with ice cream. Being a chocoholic, I had my doubts...but I must confess, the claims were spot-on and the black sapote will forever be on my purchase list if/when I see it again! This decadent fruit seems to melt in your mouth and has a cocoa flavor. It's not that sweet, nor is it tart, which is why a little ice cream or vanilla agave (something sweet) goes so well with it. 

We tried the two popular versions: a black sapote smoothie and spoonfuls of black sapote with ice cream. Smoothies are wonderful, but the fruit and ice cream choice was the winner! The ice cream complemented the fruit with each bite whereas the smoothie diluted the fruits delicate flavor. 

When you find one, this is the easiest way to prepare it...

Ingredients
  • 1 ripe Black Sapote
  • Vanilla Bean ice cream, few scoops
Directions
  1. Slice the black sapote like an avocado - around the central "pit." Twist and separate the halves and de-seed the fruit (almond-sized seeds in the middle). 
  2. Scoop some ice cream in to a bowl and then scoop out as much of the black sapote as you can and put it in with the ice cream! Or you can scoop out some ice cream and black sapote individually...but definitely eating the ice cream and black sapote in the same bite is the winner! 
Slicing the black sapote.

Slicing around like an avocado.

Twist and pull the two halves.

Pick out the large seeds in the middle.

The seeds in the middle. If you twist and pull just right, it'll all go to one side, like above!

What the "pit" looks like...a bunch of large seeds.
Note: you can eat the fruit around the seeds!

Scoop out and eat with ice cream! (we ate it all before we could get photos, sorry)
Black sapote smoothie.
We also purchased some local macadamia nuts.
The rollinia fruit, also from Tropical Fruit World.
After searching the web, I found a few recipes showcasing the black sapote:


We'll have to find some more black sapotes and try these recipes :)


For more infoTropical Fruit World.

Keywords: tropical fruit world, australia, nsw, gold coast, black sapote, rollinia, abiu.